VoiceCloudPBX System User Guide
Contents
1. System Management
1.1 Log in to the PBX 1.2 Home Interface 1.3 Create a Web Account 1.4 Create an Extension 1.5 Create a PIN
2. PBX Settings
2.1 Follow Me 2.2 Call Group 2.3 Create IVR 2.4 Edit Incoming Call Settings 2.5 Create Announcement 2.6 Upload Greeting File 2.7 Create Time Condition 2.8 Create Queue
System Management
Log in to the PBX
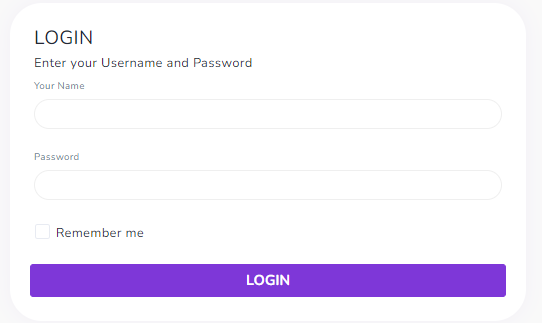
Customers should use a web browser to navigate to the PBX login link. Enter the provided “User” and “Password” information. Select “Login”
Home Interface
On this page, all the company’s Extensions will be displayed.

Create a Web Login Account
In the "User Management" tab, select "Web Account" and click on "Add New"
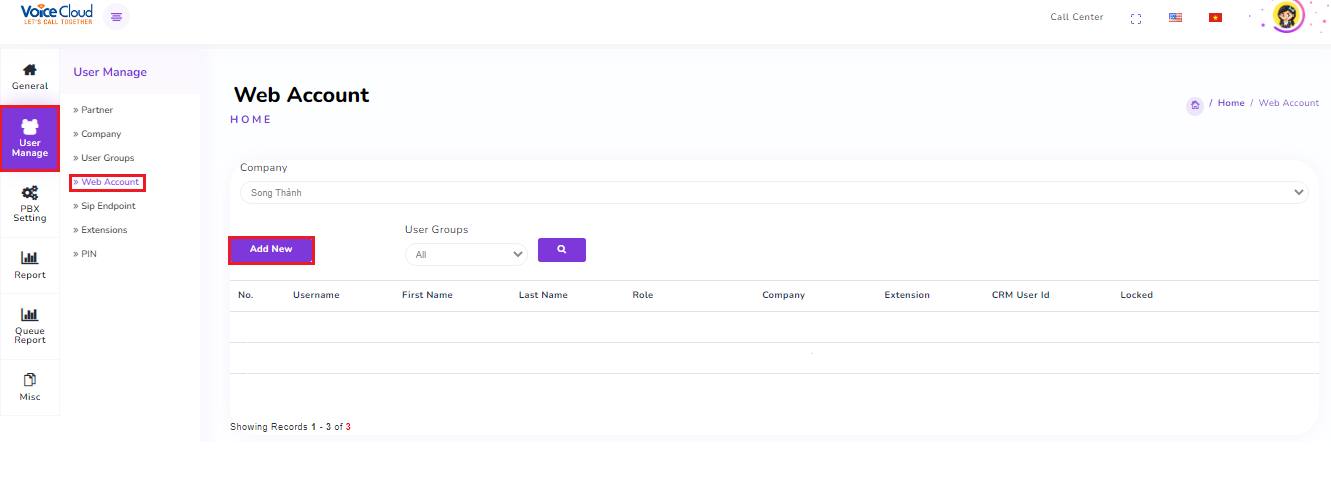
Enter the required information.

Username: Login name for the system. (Required) Password: Login password. (Required) First Name & Last Name: Full name (Optional) Role: In order of priority (Supervisor Group > Admin Group > Reception Group > Agent Group)
Supervisor Group: Manages the entire company.
Admin Group: Can listen to recordings of the entire company.
Agent Group: Can listen to recordings of a specific agent.
Reception Group: Not in use.
CRM User ID: Leave blank
Extension: Assign an agent when creating an Agent Group. Click the "OK" button to create.
Supervisor Group
Admin Group
Agent Group
Create Extension
√
×
×
Create PIN
√
×
×
PBX Configuration
Follow Me
Call Group
Create IVR
Edit Incoming Call Settings
Create Announcement
Upload Greeting File
Create Time Condition
Create Queue
Blacklist
Blacklist
×
Call Reports
Outbound Calls
Inbound Calls
Internal Calls
Answered Calls in Call Center
Unanswered Calls in Call Center
Agents Not Answering in Call Center
Outbound Calls
Inbound Calls
Internal Calls
Answered Calls in Call Center
Unanswered Calls in Call Center
Agents Not Answering in Call Center
Outbound Calls (by Agent Login)
Inbound Calls (by Agent Login)
Internal Calls (by Agent Login)
Create Extension
In the "User Management" tab, select "SIP Endpoint" and then click on "Add New"
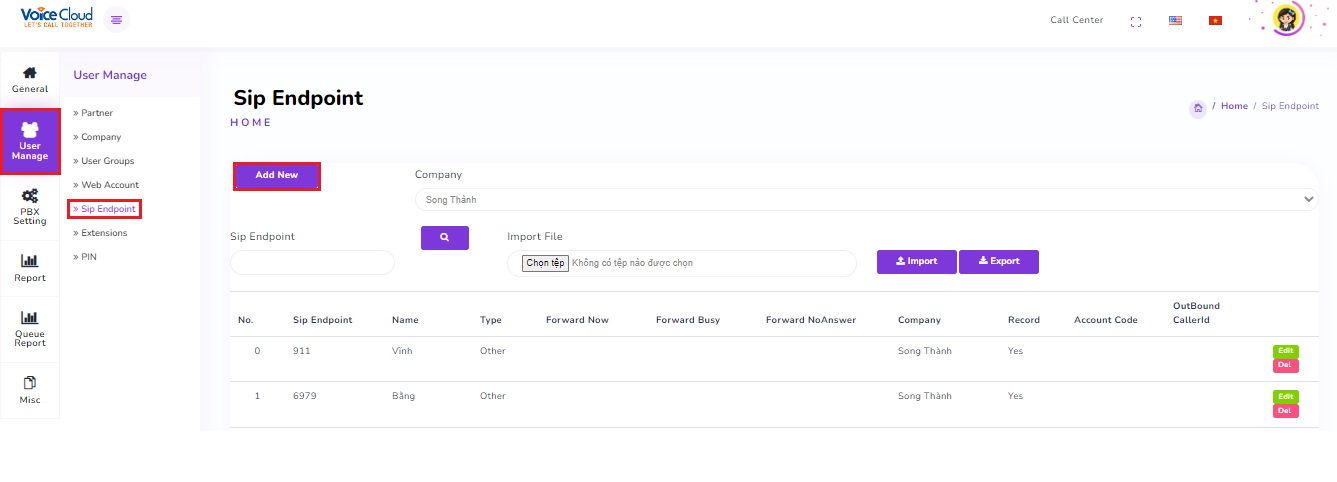
Enter the required details.

Endpoint: Extension number (3 to 4 digits) (Required)
Name: User name or number similar to Endpoint (Required)
Password: Extension password (Required)
Outbound Caller ID: Select the corresponding outbound number for the extension (Optional)
Time Out: Ring time for the Extension (e.g., 20 seconds) (Optional)
Account Code: PIN for the Extension (Optional)
Pickup Group: Group for call pickup (Optional)
Record: Enable/Disable call recording (Optional)
VM Password: Voicemail password (Required)
Click the "OK" button to create.
Export: Export configuration details of all extensions – passwords (To obtain configuration details for IP phones, softphones, etc.)
Note: To change the password for an Extension, simply edit the "Password" field
Create PIN
Click on “User Management” → “PIN” → Select “Add New”

Enter all required information:
Name: Name of the PIN (can be alphanumeric).
PIN: PIN number (4 digits).
PIN Type: The type of call for the PIN, ordered from least to most restrictive.
Local Call: Calls within the same province or city.
Long-Distance and Mobile Call: Calls to other provinces and mobile numbers.
VAT: Calls to premium-rate numbers (e.g., 1900, 1800).
International Call: Calls to international numbers.
Balance: The monetary limit for this PIN.
Billing Method: The management method for the PIN. (Prepaid means the balance must be positive to make calls; Postpaid allows calls even with a negative balance.)
Click “OK”
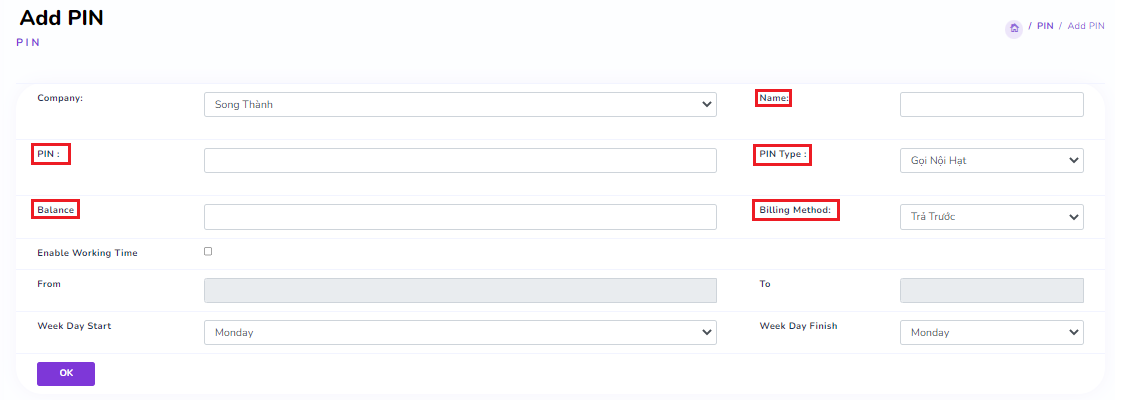
Add PIN (demo)
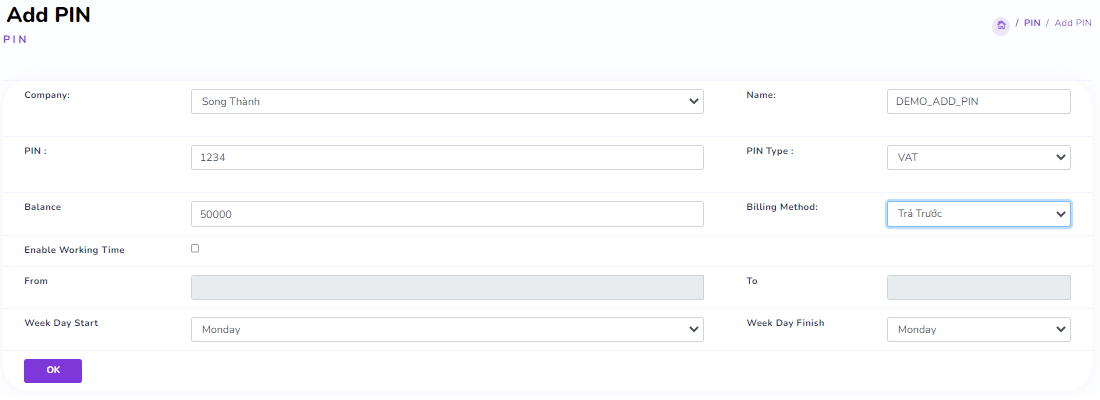
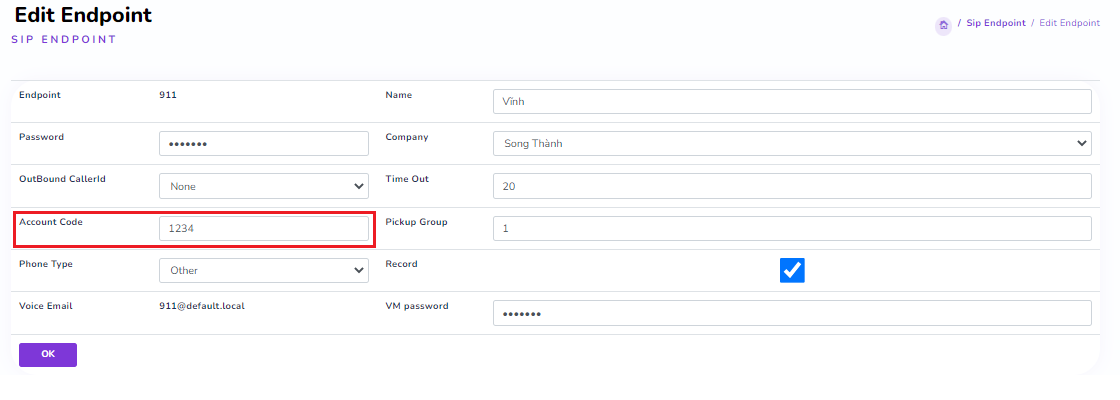
After adding the PIN, proceed to the "SIP Endpoint" section to add it to the "Extension"

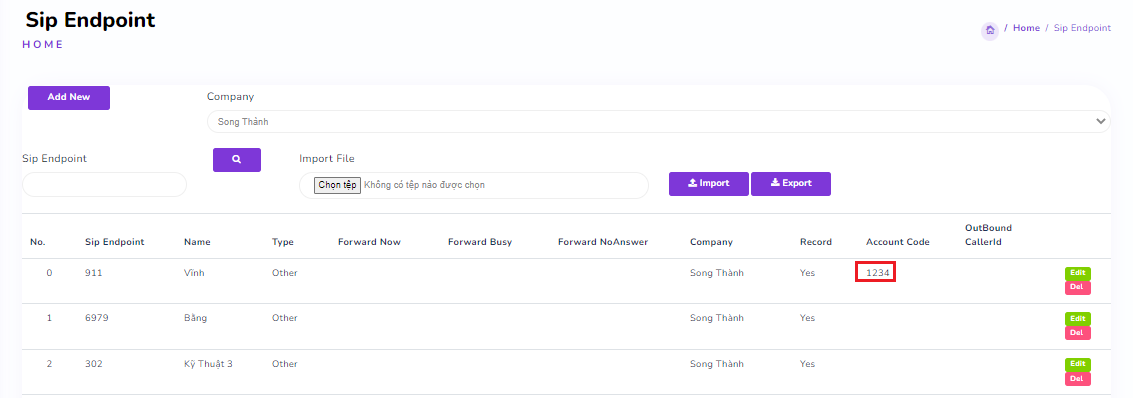
Select “User Management” → “SIP Endpoint” → Choose the “Extensions” where you want to add the PIN → Click “Edit”

Enter the created “PIN” into the “Account Code” field of the “SIP Endpoint” → Click “OK”
Follow Me
Customize call forwarding to multiple external phone numbers sequentially. In the "PBX Settings" tab → "Follow Me" → "Edit" Extension.

Enter the details into the “Follow Me List” table.
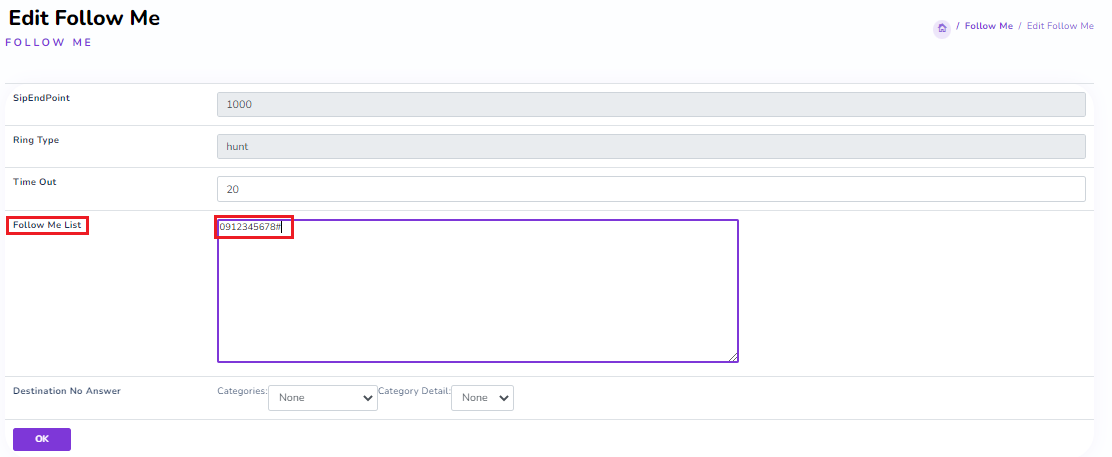
In the format: phone number #phone number# (e.g., 0903xxxxxx#0984xxxxxx#) Click the “OK” button to create.
Call Group
Create a call group for multiple Extensions. In the "PBX Settings" tab, select "Call Group"

Select “Add New” to create a new Call Group or choose “Edit” to modify existing Call Groups.
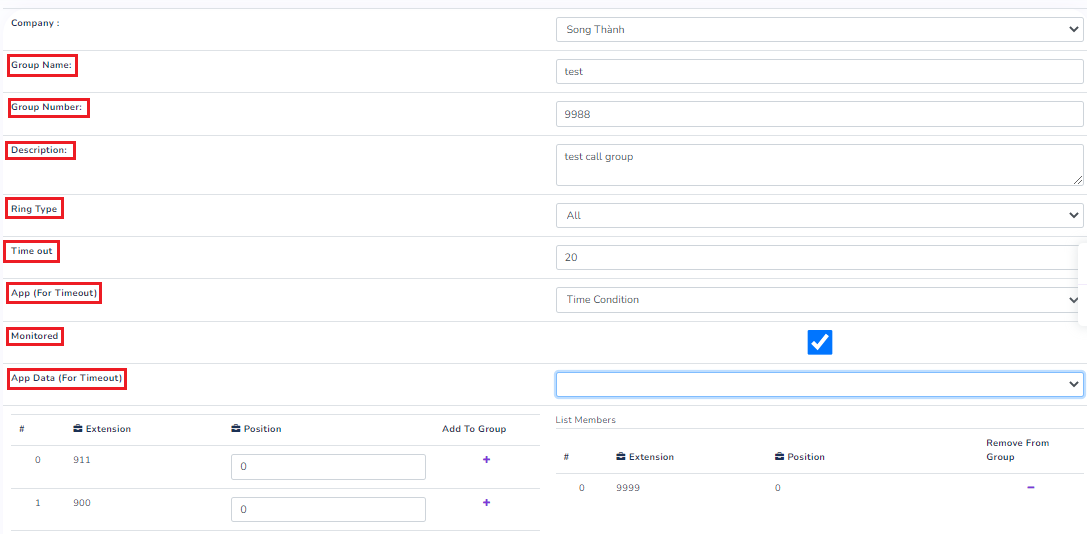
Important Information:
Group Name: The name of the group.
Group Number: 3 or 4 digits, not to be confused with Extensions.
Description: Description/Notes.
Ring Type: Customize the ringing behavior for incoming calls.
All: Rings all active devices in the group simultaneously.
Hunt: Rings active devices in the group sequentially.
Time Out: The ringing duration for each Extension in the group.
Monitored: Enable recording for this group of Extensions.
List Extensions: List of existing Extensions.
Select “Add Ext” next to the relevant Extensions to add them to the Group/Department.
List Members: List of Extensions that will be members of the Group/Department being customized.
Select “Remove Ext” next to the relevant Extensions to remove them from the Group/Department.
App (For Timeout): Specify the next action for the system when the group’s maximum ringing time expires.
App Data (For Timeout): Select the detailed value of the chosen action.
Click OK.
Create IVR
Create a customized automated interaction configuration for call distribution. In the "PBX Settings" tab, select "IVR"

Select “Add New” to create a new system greeting or click “Edit” to modify an existing greeting.
Important Information:
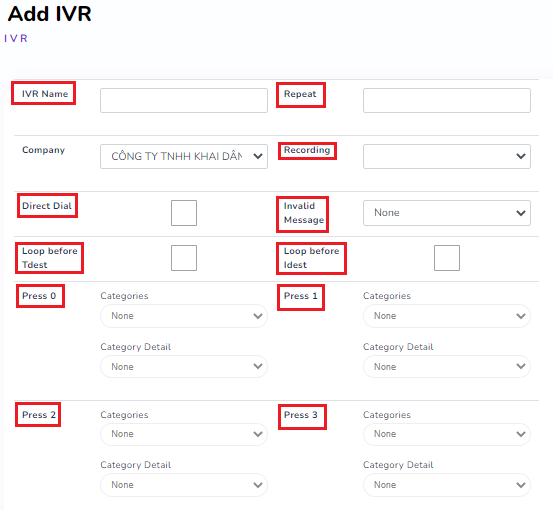
Name: Customize the name for the greeting.
Repeat: Customize the number of repetitions.
Direct Dial: Allow dialing internal numbers while listening to the greeting.
Recording: Greeting audio file (Refer to the section on Uploading Greeting Files).
Press 0 to 9: Configure interactive keys to route calls.
Timeout: Destination when the greeting has finished playing.
Invalid: Destination when the caller presses an unconfigured key during the greeting.
Select “Invalid Message” to specify the message played when the caller presses an incorrect function key.
Always check “Loop before Tdest” if you want the greeting to repeat when the caller does not press any key.
Always check “Loop before Idest” if you want the greeting to repeat when the caller presses an invalid key.
Click OK.
Edit Incoming Call Settings
In the "PBX Settings" tab, select "Incoming Call"

Select “Edit” to modify the incoming call settings for the corresponding number, or “Add New” to create a new one

Some destination types (Categories) for incoming calls:
Time Conditions: Route incoming calls based on time.
Groups: Ring multiple internal phones simultaneously or sequentially.
Extension: Directly ring an internal phone.
Conference: Transfer the call to a conference room.
Queues: Route the call to a queue.
IVR: Route the call to an interactive voice response system.
Announcement: Route the call to an announcement.
Click OK.
Create Announcement
Create/Customize a company greeting script with no key interaction. In the "PBX Settings" tab, select "Announcement" and click "Add New"

Enter the required details.
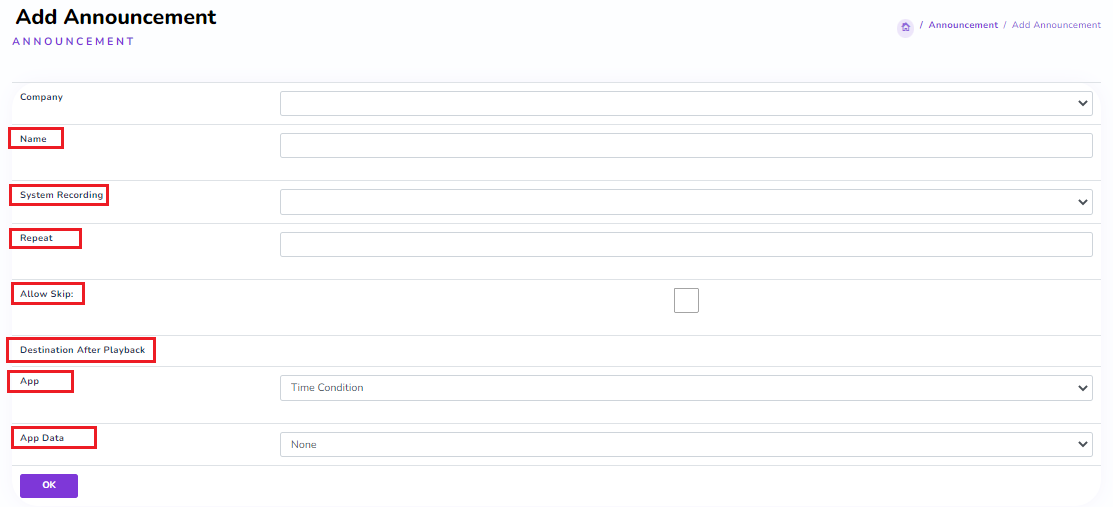
Name: Greeting Name.
System Recording: Select the greeting file.
Repeat: Number of times the greeting is repeated.
Allow Skip: Allow interruption of the greeting; if the caller presses any key, they will be directed according to the settings below.
Destination after Playback: The destination to route the call to after the greeting is played.
App: Specify the action that the system will perform.
App Data: Choose detailed options for the selected action.
Upload Greeting File
In the "PBX Settings" tab, select "System Recording"

Select “Add New” to “Upload File” to the system.

Enter a name and select the file to upload the recording to the system.
Note: The recording file must be in the correct format for the PBX system (file .wav, mono, PCM Encoded, 16 Bits, at 8000Hz). Click OK.
Create Time Condition
Create and customize a fixed time period for call routing purposes. In the "PBX Settings" tab, select "Time Conditions"

Select “Add New” to create a new Time Condition or choose “Edit” to modify existing Time Conditions.
Important Information
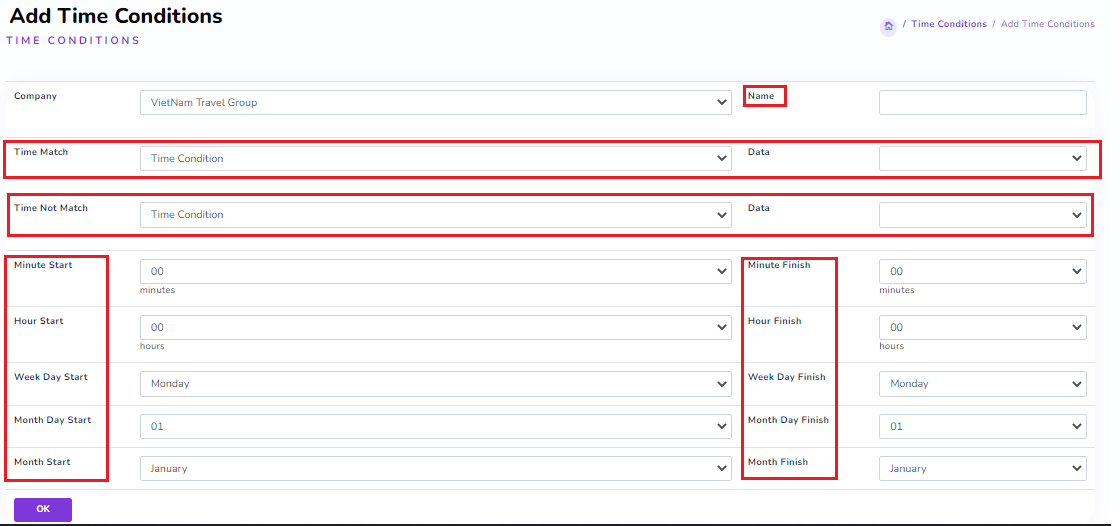
Minute Start/Finish: Minute to start/finish.
Hour Start/Finish: Hour to start/finish.
Weekday Start/Finish: Start/Finish days of the week.
Month Day Start/Finish: Start/Finish day of the month.
Month Start/Finish: Start/Finish month.
Time Match: Time falls within the selected intervals.
Time Not Match: Time falls outside the selected intervals.
The example shown above represents: Time Period: From 08:00 to 17:00, Monday through Sunday (January 1 to December 31). During this time: Calls will be routed to the IVR greeting named "Song Thanh." Outside this time: Calls will be routed to the busy announcement named "Ngoai gio." Click OK.
Create Queue
In the "PBX Settings" tab, select "Queues"

Select “Add New” to create a new Queue or choose “Edit” to modify existing Queues.
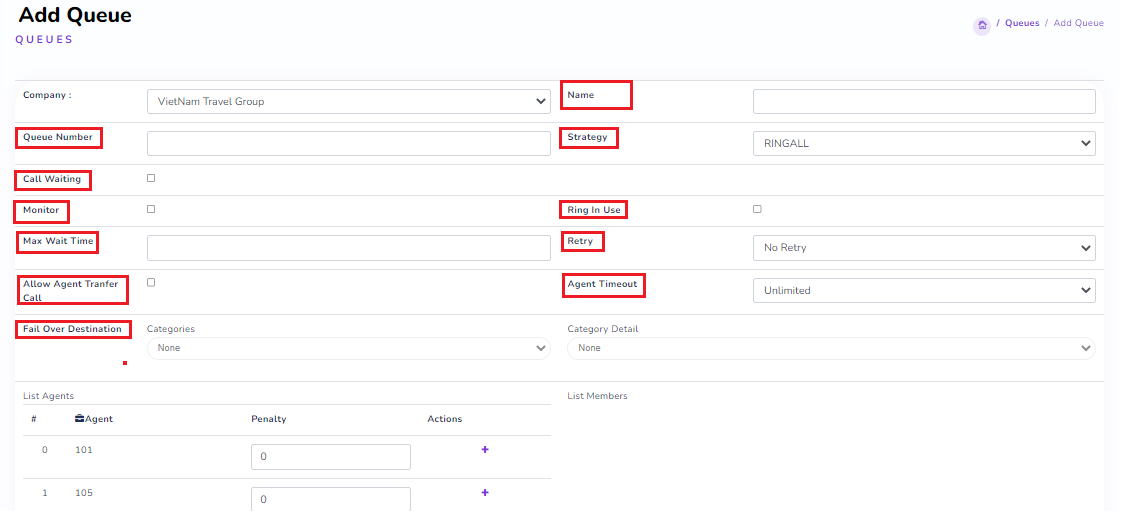
Queue Customization Parameters:
Name: The name of the Queue.
Queue Number: 3 or 4 digits, not to be confused with Extensions.
Ring Type: Customize the ringing behavior for incoming calls.
ALL: Rings all devices simultaneously.
RRMEMORY: Distributes ringing evenly over time among all devices.
RANDOM: Rings devices randomly.
Monitored: Enable recording for this group of Extensions.
Max Wait Time: The time a call will stay in the queue before being redirected.
Retry: The time an agent has to rest after handling a call.
Agent Timeout: The ringing duration for an agent.
List Extensions: List of existing Extensions.
Select “Add Ext” next to the relevant Extensions to add them to the queue.
List Members: List of Extensions that will be members of the Queue being customized.
Select “Remove Ext” next to the relevant Extensions to remove them from the queue.
App (For Timeout): Specify the next action the system will take when the queue’s maximum wait time is reached.
App Data (For Timeout): Choose detailed options for the selected action.
Click OK.
Last updated